SightSpace 3D: A SketchUp iPad Viewer with AR

Have you ever wanted to take your SketchUp models on the go? Our friends at the Boulder-based start-up, Limitless Computing, have a solution for you: their recently released SightSpace 3D app allows you to view SketchUp models on the iPad, iPhone, or iPod (Android support coming soon).

I gave it a whirl and the viewer is quite good. Orbiting a SketchUp model with single finger, panning with two, and pinching to zoom in and out is very satisfying. Loading models onto your mobile device is easy too; the Google 3D Warehouse is integrated in the app and you can also load models through Dropbox and email.

The 3D Warehouse is integrated into the app making it easy to load models

The mobile viewer would be neat enough, but SightSpace 3D’s killer feature is the Augmented Reality (AR) viewer, which gives you the ability to overlay 3D models onto the physical world. Any geo-located Google SketchUp model can be exported to a KMZ file, placed on an iPad 2 or iPhone 4, and viewed in real-time, in a real place letting you actually walk through the space. As you can imagine, this is useful for previewing construction projects, displaying kitchen designs, urban planning and much more.

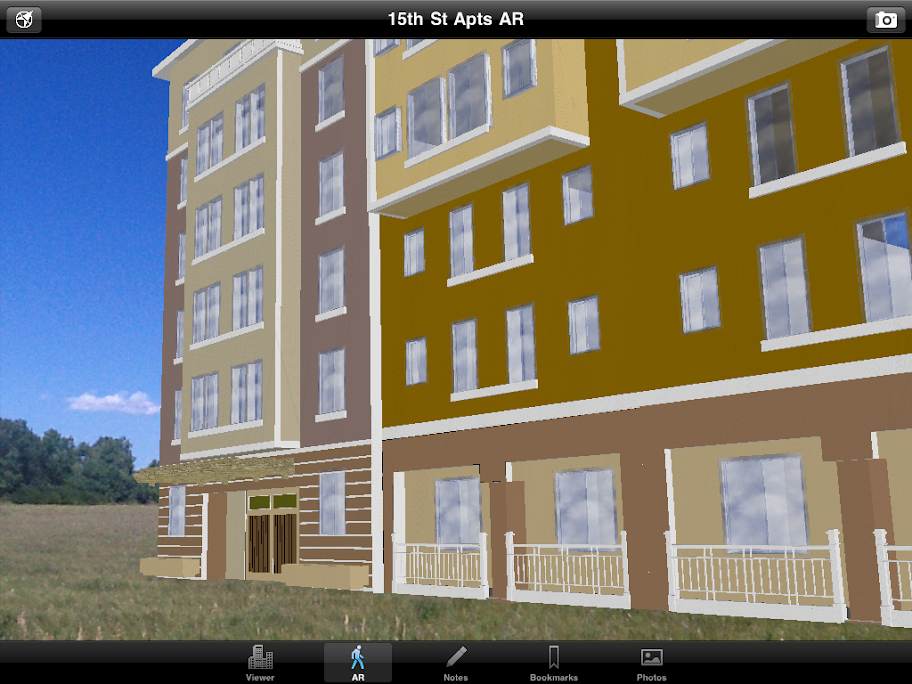
An apartment complex is superimposed on undeveloped land, to scale. (Model courtesy of Hilliard Architects, San Francisco, CA)

Additional features include bookmarking views, taking snapshots in both Viewer and AR mode, and the ability to annotate and email notes directly from the app.

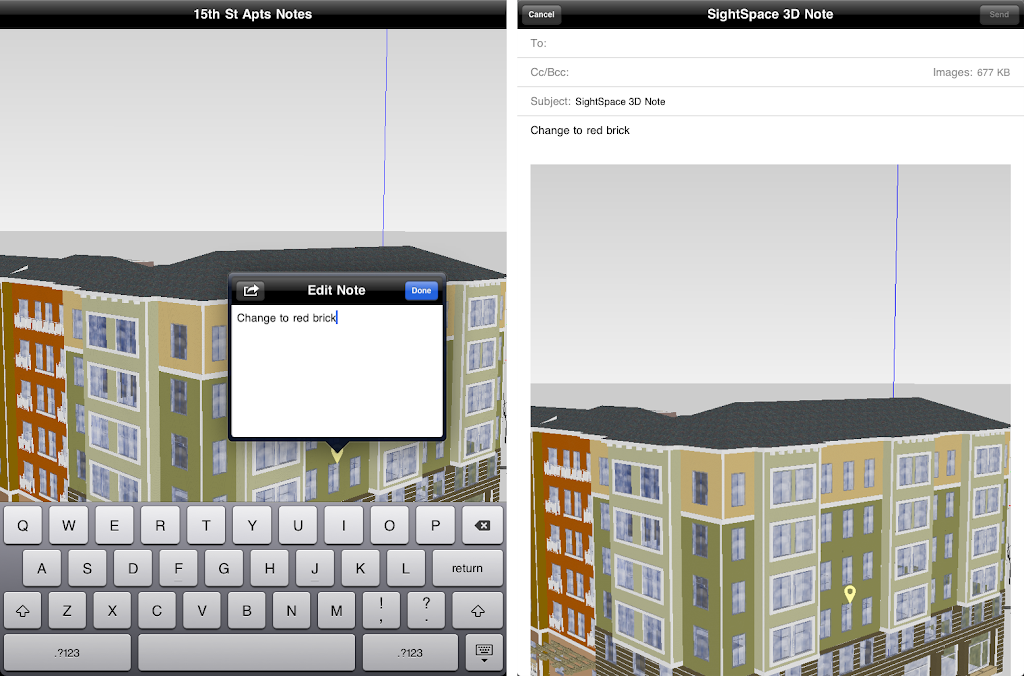
Annotations and photos of a model get added directly to an email

SightSpace 3D is available now in the iTunes store now for $15 US, so go download it today.

Posted by Gopal Shah, SketchUp Marketing

Your World in 3D, now in more languages

Earlier this summer, we unveiled a new website called Your World in 3D to help introduce users to the concept of geo-modeling — the term given to creating 3D buildings for Google Earth and Google Maps. Today, we're releasing the Your World in 3D website in 15 additional languages: Czech, German, English (UK), Spanish, French, Italian, Japanese, Korean, Dutch, Polish, Brazilian Porteguese, Russian, Turkish, Simplified Chinese and Traditional Chinese.

User generated models from around the world

Besides being fun, building your town in 3D is a great way to show civic pride, encourage tourism for your town, and promote your business. 3D modeling has also been used in crisis response situations as we saw in the grassroots modeling effort that happened after the earthquake in L’Aquila, Italy.

To see the site in another language, use the drop-down menu in the bottom of any page

Your World in 3D has all the tools you’ll need to start geo-modeling and features several examples of what fellow modeling. By releasing Your World in 3D in more languages, we hope that you and your friends from around the globe will join us to help build the most comprehensive 3D virtual mirror of planet Earth.

Happy modeling!

Posted by Nicole Drobeck, Geo Community Program Manager

Explore the ancient and modern with Rome in 3D

Rome really is an eternal city. With a history spanning over 2500 years and regimes from the early kingdom, through the republic, the empire, and later as the heart of the Catholic faith in the Vatican city, each has made their mark on the current urban architectural landscape of Rome. Now, with the release of thousands of new 3D buildings for the city, you can explore the blending of the ages in layered construction of Rome from within Google Earth.

Let’s start our exploration in the ruins of the ancient Roman forum, home of the original Roman republic. From here we can easily travel to some of the subsequent Imperial buildings such as the Colosseum (AKA the Flavian Amphitheater) and Trajan’s Market and Column.

Looking towards the Colosseum through the Roman Forum

Next, we’ll head Northwest, towards the Pantheon and Piazza Navona. The Pantheon is a great example of the layered reuse of buildings in Rome; originally built in the Republican period, the Pantheon was retrofitted with the front portico in the Imperial period, and then later converted into a church. The shape of Piazza Navona also displays its historic foundation as the site was originally the Stadium of Domitian in the Imperial era.

Central Rome showing the Pantheon and Piazza Navona

Lastly, let’s head over to the Vatican City, where we can see great examples of the Renaissance and Baroque architecture of the city in Saint Peter’s Basilica and the colonnade by Bernini around St. Peter’s square.

St. Peter’s Basilica and Piazza in Vatican City

There is much more to explore in Italy’s modern capital, so have a look around this beautiful city! And don’t forget, a few years ago we also released ancient Rome in 3D which allows you to see Rome as it was in 320 AD.

To see Rome in Google Earth for yourself, use Google Maps with Earth view or turn on Google Earth’s “3D Buildings” layer and search for “Rome, Italy”. Alternatively, you can download this KML tour from the Google Earth Gallery to take a virtual tour of the 3D landmarks for yourself. As always, feel free to use Google Building Maker or Google SketchUp to make any improvements or additions to the city or to model your own town.

Happy touring!
Posted by Mason Thrall, Program Manager, Geo 3D

Speed Up SketchUp: Extrude curves with fewer sides

The most sure-fire way to mitigate your model’s geometric complexity (its count of faces and edges) is to pay attention to extruded circles and arcs. Experienced modelers know that curves in SketchUp are actually constructed out of multiple, straight edges. By default, circles have 24 sides and arcs have 12 sides. Zoom in and you’ll see what I mean:

By default, circles you draw in SketchUp have 24 sides.

Arcs you draw in SketchUp are 12-sided by default.

When you extrude a default, 24-sided circle with the Push/Pull tool, you create a cylinder with 26 faces. Choosing View > Hidden Geometry shows the smoothed edges between the faces:

Turning on Hidden Geometry shows a default cylinder for what it really is: a 24-sided extruded polygon.

Using two default arcs and the Follow Me tool to create an fancy bullnose along the perimeter of a rectangular countertop yields no fewer than 90 new faces:

Using the Follow Me tool to extrude compound curves made out of default, 12-sided arcs results in seriously high polygon (face) counts. Thumbs-down — this is bad SketchUp practice.

Modeling a simple bike rack using a combination of 24-sided circles, 12-sided arcs and Follow Me, then placing ten of those bike racks in your design, adds more than 86,000 entities (faces and edges) to your model. Oof.

A single bike rack made by extruding a 24-sided circle along a path made from 12-sided arcs. Unless you’re designing the bike rack itself, there’s no call for adding this much geometry to your model.

A close-up of the high-polygon bike rack. Individual faces and edges are made visible by turning on Hidden Geometry. Images like this one cause expert SketchUp modelers to have nightmares.

The Solution

To dramatically reduce the amount of geometry in your models, change the number of sides in your circles and arcs before you extrude them into 3D shapes. It’s easy:

1) Create a circle or an arc using the appropriate tool.

2) Before doing anything else, type “6s” and hit Enter.

This tells SketchUp to draw the curve you just created using six sides. The “s” tells it that you’re changing the side-count and not the radius. Of course, you don’t have to choose six sides — you can type in any number you like.

Change the number of sides in the circles and arcs you draw. I know, I know — a hexagon isn’t a circle. Suspend your disbelief in order to have usable models.

Note: Once you’ve manually changed the number of sides in a circle or an arc, every subsequent circle or arc you draw will have that same number of sides.

I modeled the bike rack below using 5-sided circles and 6-sided arcs. It only has 322 faces — an 89% reduction over the bike rack I modeled using curves with the default number of sides.

Crafting a bike rack by extruding a 5-sided circle along a path with 6-sided arcs yields a perfectly usable model with substantially fewer faces and edges.

When it’s used as context in my model, can you tell the difference between the “high-poly” (geometrically heavy) and low-poly versions? I thought not.

Is the quality difference between the high-polygon (top) and low-polygon versions of the bike rack worth making your model twice as heavy? Nope.

LumenRT: Explore rendered models in real time

Plain ol’ SketchUp lets you walk, run or crawl around your model till your fingers fall off, but you’re limited to SketchUp’s selection of non-photorealistic rendering styles. Pushing your model through a fancy rendering engine can make it deliciously photograph-like, but then you’re stuck with a single image or a pre-baked path in the form of an animation.

Now you can have your cake and eat it, too. LumenRT Review for SketchUp (by the good people at e-on Software) is a tool for turning your models into interactive, photo-rendered environments. The output is a stand-alone file — a whole mini application, really — that anyone can open and explore like they’re in a video game. Take a look at this video to see how the navigation works:

The results are really pretty incredible. The LumenRT Downloads page includes a number of sample “LiveCubes” (self-contained 3D environments) that you can download and explore at your own pace. One of my favorites features Tadao Ando’s Church of the Light; here’s a video of the LiveCube on YouTube:

The computer specs necessary for creating and viewing LiveCubes aren’t minor, but serious SketchUp modelers are likely to be alright. The really good news is that LumenRT is available for both Windows and Mac, and it works with both the free and Pro versions of SketchUp 7 and 8. Licenses cost US$295, but they’re only $195 for a limited time.

Assigning materials to groups and components

Everybody knows that faces in SketchUp can be painted with different materials. What lots of folks don’t know is that you can apply materials to groups and components, too. The following illustration shows the Entity Info dialog box, which is a great place to see which materials are applied to your geometry.

The Entity Info dialog box (Window > Entity Info) shows thumbnails for the materials assigned to selected entities. When you select a face, it shows thumbnails for the front and back sides of that face (top). Groups and components have material thumbnails, too (bottom).

When you paint a group or component red, only the faces inside it that are painted with the Default* material turn red. Faces that have already been painted with another material don’t change at all.

The above group (top) includes faces that are painted with different materials (bottom). Only the top face is assigned the Default material.

Applying a material to the entire group only changes the color of faces that are painted the Default material.

This trick also works with groups and components that are nested inside one another. When you apply a material to a top level group or component, all the Default-colored faces that are inside nested, Default-colored groups and components inherit that material automatically. The following diagram is my best attempt at a visual explanation of this phenomenon.

Applying a material to a group or component that in turn contains sub-groups and component instances can be a confusing experience. Just remember that the color you’re painting “trickles down” to Default-colored faces contained within Default-colored groups and components. It’s easier done than said : )

*SketchUp automatically applies the Default material to faces you create from scratch. You can also paint anything with the Default material at any time; just pick it in the Materials Browser (which looks completely different on PCs and Macs.)

The Windows and Mac versions of the Materials Browser. On the former, the Default material is included as a permanent thumbnail; on the latter, it’s the first material in the “Colors In Model” list.

As you can see, this technique is a godsend for building complicated objects that need to change color easily. In the case of the George Nelson Marshmallow Sofa in the images that follow, the cushions are individual component instances nested inside the main Sofa component. These are assigned the Default material.

I downloaded this George Nelson Marshmallow Sofa component from FormFonts.

The individual cushions are instances of the same component. Each instance is assigned the Default material.

The faces that make up the surface of each cushion are also painted with the Default material.

All of the metal and rubber frame pieces are also groups and components, but their faces are all assigned specific materials.

The faces in the non-cushion parts of the sofa are all assigned materials other than Default.

When you use the Paint Bucket to paint a color—in this case orange—on the main Marshmallow Sofa component, only the cushions take on that color. Everything not assigned the Default material stays exactly the way it is.

Painting the sofa component orange causes all Default-painted faces to turn that color. Non-Default-colored faces remain unchanged.

Featured Geo-modeler: Guillaume Godin

Guillaume Godin is an accomplished geo-modeler based in Montréal, Canada. He has 157 models uploaded to the 3D Warehouse so far. Of those, 86 are geo-located and 72 have been accepted into Google Earth. Thank you for your contributions and keep up the great modeling, Guillaume!

I am a 3D designer and Google SketchUp freelancer. I studied administration in college and now work in publicity for a small firm. I found out about 3D buildings in Google Earth by downloading the application and using it. I started modeling because Google SketchUp is free to download and I thought I might be talented doing it.

L’édifice Grand Tronc on Rue McGill in Montréal

When i started modeling six years ago, I really liked the fact that you have the possibility to publish on Google Earth and then millions of persons can see YOUR building.That really pushed me to do better and better. It really frustrated me for a while not to be able to place photo textures on faces.

Église Saint-Pierre on Rue de la Visitation in Montréal

The first thing I do when I’m geo-modeling is to choose a location with a Google Earth snapshot, then I trace the contour of the building in SketchUp. The third thing I do is to place the axes of the model. Next, I make a group, push/pull up my footprint, then I use Street View to check the approximate height of the building I’m working on.

Le Marché Maisonneuve (Maisonneuve Market) at Place Gennevilliers Laliberté in Montréal

Farine Five Roses is my favorite model because of the sign on top which is a unique feature in Google Earth and in Montreal’s Old Port also.


Farine Five Roses (Five Roses Flour) at the Old Port in Montréal

I’d like to make Montreal and its surrounding areas more visible to the rest of the world and let people who are using Google Earth be able to use Street View to see my buildings.

1253 Rue McGill College, where Google’s offices in Montréal are located

I think the Google team have developed such nice and free tools for 3D that anyone with absolutely no experience can become a good modeler.

Inspirational new book: Google SketchUp Workshop

When it comes to instructions for building your first house, or your first bench, or your first Google Earth model, there is no shortage of available materials. But what happens after you’re a SketchUp rockstar? Where are all the tomes full of delicious inspiration for those of us who have mastered inference locking and nested section planes and scene properties? It’s all fine and well to read about how SketchUp works, but real progress comes from peeking over our peers’ shoulders to see what they’re working on.

And that’s exactly the concept behind Laurent Brixius’ brilliant new book Google SketchUp Workshop. Translated from the original “Créer avec SketchUp” (originally published a few years ago in French) this full-color volume presents sixteen beautifully illustrated case studies authored by expert SketchUp users from a multitude of different disciplines. Each one includes high-level workflows, tips and techniques for using SketchUp in a different field of design. Architecture, urban design, engineering, process plant design, woodworking, theater set design and architectural graphics are all represented.

Our friends over at SketchUpArtists.org conducted a nice interview with Laurent (the book’s editor) before the English edition came out. An architect, architectural 3D artist and author from Belgium, he’s done an amazing job of assembling a collection of projects that are pure inspiration. This is a book that belongs on the shelf of every SketchUp aficionado.