Featured Modeler: Sami Araboghli

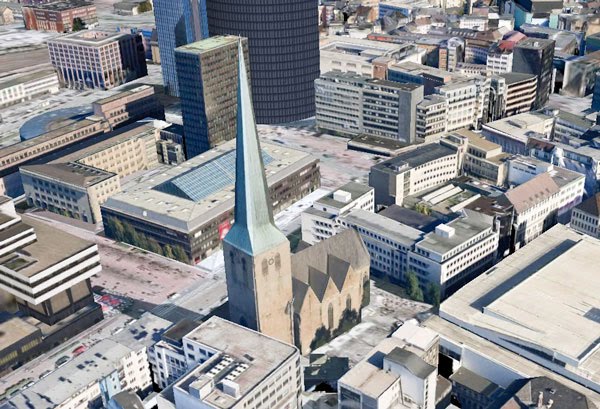
Anyone can build 3D models for Google Earth — no matter how old they are. Eighth grader Sami Araboghli of Sarasota, Florida is a case in point. Sami wants to put the entire world on Google Earth one building at a time. Currently, he has 179 models in the Google 3D Warehouse.

When Sami first started using Google Earth, he noticed lots of 3D buildings popping up and wanted to see his own models appear. After finding Google SketchUp, he started investigating how to take the models from his computer and share them with everyone else in Google Earth. After his first effort was not accepted for inclusion, Sami started researching ways to improve his models. He now has 29 3D buildings (and counting) accepted into Google Earth’s default 3D Buildings layer.

Sami starts his modeling experience by using Google Maps to find a building that interests him. In most cases, he hasn’t physically visited these locations; Sami uses Street View in Google Maps to acquire the imagery he needs (this video shows how). The first model he created with this method was a Citroën car dealership in Prague, Czech Republic.

Sami says: “I want to be heard, and to tell people that anyone — no matter how old you are — can put buildings on Google Earth and they too can be heard.”

Sami describes Google SketchUp and Google Earth as his favorite software applications; sometimes he spends the entire day making buildings. He loves the idea of being able to put buildings in Google Earth and share them with friends. Says Sami, “I think it was one of Google’s coolest ideas.”

Sami also told us that he will be in the National Geographic Florida State Geography Bee competition on April 9th. Good luck Sami!

Explore the world with new iGoogle themes

(Cross-posted from the Google Lat Long Blog)

Today the iGoogle team announced a new set of themes designed for the world traveler in all of us. There are 25 themes that highlight places around the world and include beautiful scenery, historic monuments, exotic beaches, iconic cities, and breathtaking sites.

In addition to partnering with National Geographic Society, LIFE, Lonely Planet, UNESCO, and visiteurope.com to bring you the stunning imagery featured in most of the themes, we also created a couple of themes using imagery from Google Earth.

The 3D Cities in Google Earth theme puts you in the middle of the action in New York City and Tokyo. It transports you to the ancient ruins of Athens, Greece, and takes you down under to Melbourne, Australia. It also gives you a glimpse into the historic architecture of Budapest, Hungary; Copenhagen, Denmark; and Vienna, Austria.

The 3D Views in Google Earth theme gives you a birds-eye view of a couple of natural wonders in the Unites States — the Grand Canyon and the Great Lakes. It transports you to the last of the remaining Seven Wonders of the Ancient World — the Great Pyramid of Giza in Egypt. And you can view the stunning architecture of the Taj Mahal in India. Lastly, relax in Positano, Italy, or Bondi Beach, Australia.

We hope that you enjoy our new iGoogle themes and that they’ll help inspire you to keep exploring the world around you.

Tour the March Madness arenas in 3D

Hello college basketball fans! It’s March and that means March Madness is in full swing. 65 teams were pitted against each other in this single elimination tournament to decide the 2010 NCAA Men’s College Basketball Championship. In getting into the spirit of the season, Google launched a College Basketball webpage to see the latest results, get live information on teams, manage your bracket, and tour 3D models of the arenas.

Here at the SketchUp office, we gathered 14 models of the arenas and added them to a Featured Collection. These models are located all over the country, and largely created by users like you. Especially cool is the model of the Energy Solutions Arena in Salt Lake City, where you can fly inside and see the interior of the model! Both the Edward Jones Dome and the HSBC Arena are great examples of high quality photo-texturing, and the Lucas Oil Stadium in Indianapolis was created using Google Building Maker.

We also put together a 3D tour (kml file) of these arenas for Google Earth 5. You can see the relation of the cities to one another and explore the surrounding 3D models. Creating a tour like this is a snap with the touring feature in Google Earth 5.

So explore the collection, enjoy the tour and hopefully rejoice in how well your bracket still looks.

Dortmund, Germany in 3D

We’re happy to announce that the city of Dortmund, Germany is now in 3D – with Google Earth. The new 3D building models extend from the city center to the edge of the Westfalenpark, an area of open space where locals visit to “wandern”.

Like many medieval cities, Dortmund is punctuated with churches and other relics that have a history dating back to the Holy Roman Empire. An example would be the Petrikirche (St. Petri Church), which was built in the middle of the 14th century. The church was modeled by geo-modeler “chrischibuilder” using Google Building Maker.

The tallest structure in this northern German city is the Florianturm, a TV tower with a height of 219.6 metres that sits at the center of the Westfalenpark. The tower was modeled by geo-modeler “Zeitreise Ruhr” using Google SketchUp. Watch our video to fly to the tower and other landmarks in Dortmund. We invite you to start exploring Dortmund in 3D!


​Using SketchUp to create hand renderings

This case study was submitted by Michelle Morelan, an interior designer in Vancouver, B.C. I first discovered Michelle’s SketchUp drawings on her blog, A Schematic Life. We have posted the first part of her case study below, but continue reading it on our website to see additional designs and to learn how she uses Google SketchUp in her unique workflow.

At Michelle Morelan Design, we offer a full range of Interior Design services: interior planning and design, renovations, and project management. You can choose from full design services or e-design.

We use SketchUp from importing site dimensions through schematics and design, and onto working drawings. The great thing about SketchUp is it gives you instant feedback. What would the accents look like in red?…where should I put them?…how long and thick should this wall be?…even what it looks like to walk from one space to another. It also blurs the line between schematic and working drawings, because you build and design to scale. This means you can use the same model for working out the design as for contract documents or working drawings, saving lots of time. With the use of a section plane, by turning off the perspective view and adding dimensions, you take the drawing to that next level.

One thing that’s different about the way we use the software are the hybrid drawings that have become our specialty. Our firm has created a niche by building 3D models and rendering perspectives for other designers and homeowners, as well as creating stunning and precise visuals for our own firm’s presentations. Continue reading…


Moving dimensioned model views in LayOut

Moving stuff around on your LayOut pages is a pretty simple operation: All you have to do is use the Select tool to put things where you want them. (You can also use the arrow keys to nudge elements around in small increments. Holding down Shift while you nudge multiplies the increment by a factor of ten).

If you’ve dimensioned a SketchUp model view, things can get trickier. Since each dimension is technically a separate element, and since dimensions are connected to the underlying geometry in your model, moving things requires you to be a little more intentional about what you intend to move:

Selecting and moving just the model view causes any associated dimension to do everything it can not to move. Extension lines (leaders) stretch and shrink to stay connected to the model, but the rest of the dimension tries to stay put. See below:

Moving only your model view causes your dimensions’ leader lines to stretch.

Selecting the model view AND its associated dimensions THEN moving everything causes everything to stick together as a single mass; most of the time, this is the behavior you’re after. Here’s what I mean:

Selecting your model view and its associated dimensions lets you move everything at once.

For this reason, I like to group together (right-click > Group) model views and their associated dimensions to keep things tidy. To edit a group, just double-click.

Posted by Aidan Chopra, SketchUp Evangelist

Green design in the Mt. Annan Botanic Garden

We received this story from Kennedy Associates Architects in Australia through the SketchUp Go Green! website. Read below for their story on how they used Google SketchUp for their project and watch an animated video.

The Bowden Centre is a new educational and multipurpose resource building at Mount Annan Botanic Garden, Sydney NSW. The building’s primary purpose is to provide a teaching facility for the numerous school groups who visit the garden every year — a place to learn about the garden and Australian flora. However, the facility has also been designed to accommodate a broad range of other activities, from seminars to weddings.


The brief for the project, the first permanent building at the Botanic Garden, was to set the benchmark for future buildings on the estate and to provide a unique multi-function facility that demonstrates high standards of ecological sustainability, within a very modest budget.

This was achieved through, amongst other things, siting the new building in the location of an existing structure, recycling the steel structure and aluminum windows from the earlier building, the use of low maintenance materials, the thermal management of the building via a ground coupled, water based air conditioning system and the inclusion of a series of plywood clad, vertical wall openings that act as alternatives to conventionally glazed windows.


What prompted us to spend the time building the SketchUp model was that we were preparing a talk about the building and wanted a method to explain concepts behind the building design. We set upon using the SketchUp animations as a way of bringing these concepts to life, particularly through the use of the sectional animations. We now regularly use SketchUp animations as a presentation tool to present models built in our CAD package.

Shooting for three: Keeping up with the Madness

(Cross-posted from the Google Lat Long blog)

Do you feel it, sports fans? Has the anticipation fully gripped your college basketball soul? It’s definitely got my attention. Therefore I’ve embarked on my third consecutive journey into mapping the NCAA College Basketball tournament. This may have caused a bit of personal March madness – a lot of long nights and triple-checking each arena placemark – but I hope you’ll enjoy the result. I’ve made a Google Earth KMZ file that includes the home arenas of the field of 65, and the 14 tournament venues. Each entry in the field of 65 is color coded by region and the game sites have a special basketball icon this year.

You may wonder why I’ve kept this up for three years. Well, aside from the fundamental fact that I’m a college hoops nut, I just so happen to also love seeing the geo-spatial distribution of the teams. The research and compliation of the information led me to several interesting facts you can see for yourself in the layer and then use to wow your friends, such as:

  • There are two first-round matchups that pit two teams which have the same mascots
  • Bears, Eagles, Gophers, Grizzlies, and Lions have a common trait: they are all ‘Golden’
  • This year’s tournament is quite colorful: Blue Devils, Mean Green, Orangemen, Big Red, and Yellow Jackets

This My Map also shows you all the key locations for the Madness, color-coded for your viewing pleasure. The East division is indicated by a blue pin; South with green; Midwest with red; and West with cyan. The pins with a dot in the center tell you who the #1 seeds are. View the College Basketball Tournament 2010 in a large map.

Travel to the tournament without leaving home! All 14 arenas are in the “3D Buildings” layer in Google Earth, ready for you to explore. Take a tour of these 3D models by watching the video below or download this kml tour and open it in Google Earth 5. Be sure to check out the Energy Solutions Arena in Salt Lake City — even the court is modeled.

Also, teaming up with a few other March Madness enthusiasts, we’ve created a page, google.com/collegebasketball2010, where all of you basketball fans can find additional Google tools to help you track the tournament. Keep up with your favorite teams and get up-to-date information on scores, schedules, and brackets with our iGoogle gadget. By doing a quick search for your favorite team, you can see live scores. If you haven’t already made a bracket, check out our Google docs tournament bracket template to help you create and manage your pool in an online spreadsheet. You can also see real time search results so you never miss any March Madness news or chatter!

For all the times when I can’t be planted in front of my television watching the action (or during those pesky commercial breaks), these tools will keep my head in the game!

Towns galore!

The deadline for entries to the Google Model Your Town Competition has passed and we’ve received some stunning town models. Over 160 teams entered and we’ve gathered many of the collections in an official Competition Collection you can peruse now. The five finalists have been notified and they will be publicly announced on April 1st. Cast your vote for your favorite town between April 1st and May 1st on the voting page that will be live on the competition site. We’ll announce the winning town on or around May 15th. Stay tuned!

Using Scenes to control layer visibility

In a previous blog post, I talked about how I use the Outliner and Layers to organize my models once they start getting big. The short version is that I prefer to use the Outliner to control the visibility of individual groups and components, but that I sometimes use Layers to turn on and off large sets of objects that affect my computer’s performance.

This time, I’m going to focus on a faster (some might say smarter) technique for controlling the visibility of elements in your models: You can use Scenes to hide and unhide things without having to go anywhere near the Outliner or Layers dialog boxes.

The key to using all of the deliciousness built into Scenes lies in expanding the Scenes Manager (Windows > Scenes) to reveal its extra functionality; the part we’re interested in is the “Properties to Save” section at the bottom:

Click the Expand toggle in the upper-right corner to see the rest of the Scenes manager. The “Properties to Save” section lets you determine which display settings each scene should remember.

You can customize a scene you’ve created by telling it which properties (display settings) it should save. Just select a scene in the list at the top the Scenes manager (single-click to select it), then choose which properties you want from the list. There’s no “save” or “update” button to press; a setting is automatically saved as soon you select its checkbox.

Example

Consider the simple building I created for a previous post. In it, I created a layer specifically for all of the furniture in my model. For this example, I’ve added another layer to contain all of the elaborate trees I’ve added. Isolating the geometrically-complex parts of my model on separate, discrete layers makes them easier to hide when I want to boost my computer’s performance and get a better view of what I’m working with. See below for the updated, leafier model:

Placing “heavy” stuff like furniture and trees on separate layers makes it easier to hide everything quickly.

I’d like to use Scenes to turn on and off my Furniture and Trees layers without having to access the Layers manager. To do so, I make two new scenes which will each have only one saved property: “Visible Layers”. Here’s how:

  1. Open the Scenes manager (Window > Scenes) and expand it by clicking the toggle in the upper-right corner.
  2. In the Layers manager (Window > Layers), turn off all the layers you want to control with a scene. (In this case, Furniture and Trees)
  3. Create a new scene by clicking the Add Scene (+) button.
  4. Name the new scene “Entourage OFF”.
  5. Make sure only “Visible Layers” is selected in the list of Properties to Save.
  6. Turn on the layers you turned off in Step 2.
  7. Repeat Steps 3 through 5, naming the newest scene “Entourage ON”.
Use the “Visible Layers” property to create scenes that control layer visibility.

Now all I have to do to hide my furniture and trees is click the “Entourage OFF” scene tab at the top of my modeling window. Since the only property saved by that scene relates to which layers were visible when it was created (or updated), no other display properties are affected by activating the scene. To turn everything back on, I click “Entourage ON”.

Feel free to download the model (SketchUp model) and try it yourself. Open the Layers and Scenes managers to see how everything’s rigged up.

Posted by Aidan Chopra, SketchUp Evangelist